Tuesday, July 10, 2012

Garden Update

Our weather finally turned! The region was cold and wet the first part of the growing season but the last couple weeks have amazing and everything has really taken off!!!

Cucumber starts were planted on 5/15 (7 weeks ago)
Sugar snap pole peas on a trellis planted from seeds on 6/1 (5 weeks ago)

In the foreground you can see the pole beans that
we planted 6/1 (5 weeks ago)
The raised bed in the foreground contains heirloom Isis and Cherokee Purple
Tomatoes as well as leaf lettuce and chives. The bed to the left contain carrots
lettuce and Russian Red Kale all planted from seeds 6/12 (4 weeks ago) 

Sunday, July 1, 2012

Raised Garden Bed Plan

Hey everyone! I decided to do a quick drawing to better explain the construction of our raised garden beds. Pay attention to how we overlapped the edges this provides much more structural rigidity epically while transporting the raised beds to the garden. Check out our post below for actual photos of the construction. - Jon

Raised Bed Garden Plan

Thursday, June 28, 2012

How To Make Your Garden Look Professionally Designed on a Dime

Hey guys!

Brittany here. So today I wanted to tell you about the luck we had about finding some free gardening supplies online!
Jon had been talking about buying some pavers from Lowes, or Home Depot, so naturally we were preparing to fork over a bunch of money to be able to have the adequate amount. So before buying he had looked on Craigslist just in curiosity to see if we could find anything for cheaper or free, and luckily we found a posting by a person a couple towns over that had about 80 pavers for free because they had just remodeled their backyard! So being ecstatic, we jumped on the opportunity to save a dollar.
Although we had to travel about 25 miles to get them, it was well worth it. Some were in perfect condition and some were dirty but it doesn't matter if they are just going to get dirty once set on the ground.
Now that we had the pavers we got started on ways we could utilize them, first we used them to put under our cucumber and pea planters that we had built. Having more pavers than we knew what to do  with them, we put them all around the garden but had noticed that grass was starting to grow between each of them.

The start of lying down the pavers in the garden. 
We felt it looked rather sloppy to have it looking the way it did and so we decided to start over in a sense of design.
We removed the pavers from inside the garden and went to our local wood recycler (called H & H; we get some of our soil there. Great price and all organic.) While we were there we decided to pick up some pea gravel that they sell, also a great price $22, so we got a half yard.

Eager to get started, we put the pavers on the ground to create a perimeter and lied down landscape fabric in the areas we were going to put the pea gravel down.
After many back and forth trips from the truck bed to the garden, we finally had finished the design we had strived for to begin with. 
Later we stacked the pavers by two high so the pea gravel would easily stay inside the area and not scattered everywhere in the yard.

Thanks for stopping by, PLEASE SUBSCRIBE! :)
-Brittany!

Wednesday, June 27, 2012

Great Resource for Northwest Gardeners

This is a great free e-book I found supplied by the Oregon State University Extension service definitely worth a few minutes of your time.

Tuesday, June 26, 2012

Growing Cucumbers and Peas in a Small Space

In our research we came across a youtube video from GrowingYourGreens.com.


The video shows cucumbers growing vertically in a very narrow planter box. We felt this would be appropriate for our garden design because if it works we can save a lot of space. We did make the bed a bit wider. We changed the inside dimensions to 9.5" wide 60" long and 14.5" tall. The lattice is simple plastic garden fencing. We also built a similar bed for our sugar snap peas pictured next to the cucumber bed. Cucumber starts were planted approx 6" apart, sugar snap peas were planted in 2 rows 2" apart. The wood we used was leftover from a previous project. I would say if you went out and purchased everything new you would probably have no more than $25 into this design. Remember whenever growing in raised beds use the best organic matter you can find and follow
a mix recipe such as Mel's mix. We also mulch regularly with good organic compost.
Just After Our Starts Were Planted
Our Lattice Was Built out of 2X4 Untreated Ash
Inside Dimensions 9.5"X60"X14.5" tall
After 2.5 weeks
We Used Nylon Zip Ties to Train the Cucumbers up the Trellis


Peas Planted 6/1/12 Sprouted After 3 Days


Sugar Snap Peas After 3.5 Weeks
Another View at 3.5 Weeks


Monday, June 18, 2012

Building Raised Garden Beds

Materials
We chose to build our beds out of western red cedar fence posts. Cedar is naturally resistant to rot. One 6"X1"X6' plank will set you back around $2 in the Vancouver, WA area. You can use any material you have available, just stay away from pressure treated wood or materials painted with an unknown material both of which can contain chemicals that can leech into your beds and eventually your plants.

Design
Our design was simplistic. Since our boards were 6' long our beds were built 3' by 3'. From our research the adequate depth for raised bed seems to be around 6" to 10". When your garden is full of good organic matter roots do not need to grow as deep as they would in a soil that is less nutritious.

Construction
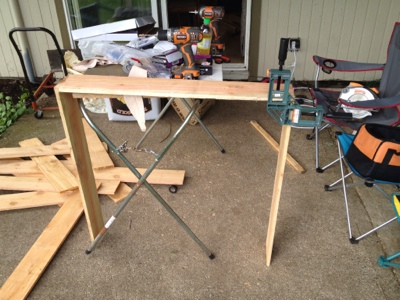
Cutting the cedar boards exactly in half and making 3' by 3' squares and stacking them 2 squares high gave us 9 square feet per bed and approx 10.5" high. We drilled pilot holes bigger than the diameter of the screws to reduce the chance of the wood splitting. We drove the screws into the cedar with a electric impact. I highly recommend investing in one if you do any work around the house. The advantage we found with the impact was driving screws. The impact will drive screws that are impossible to drive with a standard electric drill.

1X6X6' Cedar Fence Boards (untreated) Cut in half to 3' cost 1.88 each
The Board to the Right was Drilled Larger Than the Diameter of the Wood Screw the Board to the Left was Drilled With a 1/8" Pilot Hole to Reduce the Chance of Splitting

As You Can See a Right Angle Clamp is Quite Useful Here


3 of 4 Sides Finished


1 3'X3'X5.5"Box Finished


Two Boxes Were Stacked Together and Screwed Together With a Piece of Scrap 1"X1" ash Each Bed Had a Final Dimension of 3'X3'X11" Tall


Landscape Fabric Over the Pavers


Cardboard Over the Landscape Fabric


Research and Resources

Our Research and Resources

It can be difficult to weed through all the resources available to the first time gardener. We decided to do some of the footwork for you. Here the print and internet resources we found valuable, I would also recommend seeking advise from local resources such as trusted locally owned garden centers or neighbors that garden.

Print Resources

The techniques we use may have to be adapted to best work in your region. Most of the techniques we use are right out of Mel Bartholomew's "All New Square Foot Gardening".


The other book we picked up was on sale at a local close out book store, "Readers Digest Organic Gardening For The 21st Century". It contains lots of good info on organic gardening as well as presents well as a coffee table book for guests.

Internet Resources

Jon Kolther's www.growingyourgreens.com in a very well presented YouTube channel that contains hundreds of videos that seeks to answer many of the questions. In fact our cucumber and snap pea trellises were inspired by one of his videos.

www.essene.com/Vegetarian/PlantSpacingsInASquareFootGarden.htm a great quick reference guide for plant spacing recommendations in your square foot organic garden.


$12 Well Spent

Tuesday, June 5, 2012

First Try Not a Success

After a few weeks we were starting to see signs that our attempt was a failure. Most of the plants showed stunted growth or no growth at all. I feel this was caused by a few factors.

1) location, the corner of the yard is shaded by the fence part of the day and likely does not have adequate air circulation for some types of plants.

2) Soil, at the time we were not aware of the benefits or organic gardening. We did not test our existing soil before hand and used a miracle-gro top soil loaded with chemical fertilizer. As you can see from the picture we did not use enough top soil to even begin to see the benefits of a raised bed.

3) Timing, we likely planted too early for our zone.

So it is back to the drawing board.
-Jon
First Try Did Not Turn Out So Well

Monday, May 28, 2012

The Beginning

My family always had a garden when I was a kid. I remember shoveling top soil out of my dad's truck and spreading in around the garden. When we got into the new house I felt like I should start one again. For our first attempt I went to a local big box store and purchased 1 10' 2"X8" and 1 16' 2"X8" both were cut in half and screwed together to build our first raised bed. I purchased 2 bags of Miracle Gro garden soil and mixed it with whatever native soil was on sight. Below is the result. -Jon
Backyard After Our First Raised Bed Was Constructed

Sunday, May 27, 2012

Welcome!


Thank you for visiting our blog! My name is Brittany and my boyfriend's name is Jon. We just moved into a house in March and took up urban gardening as a hobby that we have come to find we enjoy very much! Jon and I are in no way professional landscapers, horticulturist, or gardeners by any means. Most of our ideas we have come out of no where and we research the questions we have online. Here we will explain what we have built, what we built it out of and any other gardening tips we may have, in hopes that you might have an easier and fulfilling gardening experience like we have! Thanks again for visiting and don't forget to subscribe! - Brittany! 
One small step...